
To check the primary oil on a Harley Davidson, locate the primary chaincase and remove the inspection cover. Ensure the bike is level and inspect the oil level.
Maintaining your Harley Davidson’s primary oil is crucial for optimal performance and longevity. Regular checks help prevent potential issues and ensure smooth rides. The primary oil lubricates the primary chain, clutch, and other components within the primary chaincase. Ensuring the correct oil level and condition can significantly enhance your bike’s performance.
This process is relatively simple and only requires basic tools. Regular maintenance can save you from costly repairs down the line. Always refer to your Harley Davidson’s manual for specific instructions and recommended oil types. Proper care keeps your motorcycle running smoothly and efficiently.
Table of Contents
Introduction To Primary Oil In Harley
Primary oil is crucial for your Harley Davidson. It lubricates the primary chain. The primary chain connects the engine to the transmission. This oil keeps the system running smoothly. Without it, your bike can face serious issues.
The Role Of Primary Oil
Primary oil reduces friction in the chain. It also helps cool the engine. It prevents wear and tear. This oil ensures smooth gear shifts. It keeps the clutch plates in good condition.
Why Regular Checks Are Essential
Regular checks keep your bike healthy. They help you spot problems early. Checking the oil prevents breakdowns. It saves you from costly repairs. It ensures a safe ride every time.
| Reason | Benefit |
|---|---|
| Prevent Wear | Longer engine life |
| Spot Issues Early | Save on repairs |
| Ensure Safety | Safe rides |
Tools And Materials Needed
To check the primary oil on your Harley Davidson, you need specific tools and materials. Having the right items ensures a smooth and efficient process. Below, we break down the essential tools and how to prepare your workspace.
Gathering The Right Tools
Ensure you have the following tools before starting:
- Allen Wrenches: These are crucial for removing bolts.
- Oil Pan: This will catch any dripping oil.
- Flashlight: Helps you see clearly.
- Shop Towels: Keep these handy for cleaning spills.
- Torque Wrench: Ensures bolts are tightened correctly.
- Primary Oil: Use the oil recommended by Harley Davidson.
Preparing Your Workspace
A clean workspace is essential. Follow these steps to prepare:
- Clean the Area: Make sure your workspace is free of debris.
- Gather Tools: Place all your tools within easy reach.
- Position Your Bike: Ensure your Harley is stable and upright.
- Lay Down Towels: This will catch any spills and keep the area clean.
By gathering the right tools and preparing your workspace, checking the primary oil on your Harley Davidson becomes a hassle-free task.
Locating The Primary Oil Inspection Cover
Checking the primary oil on your Harley Davidson is crucial. It ensures your bike runs smoothly. The first step involves locating the primary oil inspection cover. This guide will help you find it easily.
Identifying The Inspection Cover
The inspection cover is usually on the left side of your bike. It’s near the primary chaincase. Look for a small, round or oval cover. This cover has several screws around it. You may need a hex key or Torx wrench to remove these screws.
Safety Precautions
Safety is important when working on your bike. Follow these steps:
- Ensure the bike is on a flat, stable surface.
- Turn off the engine and let it cool.
- Wear gloves to protect your hands.
- Keep a drip pan ready to catch any oil.
| Tool | Purpose |
|---|---|
| Hex Key | Remove screws |
| Torx Wrench | Remove screws |
| Gloves | Protect hands |
| Drip Pan | Catch oil |
Credit: blog.amsoil.com
Steps To Check Primary Oil Level
Maintaining your Harley Davidson requires checking the primary oil level regularly. This ensures smooth operation and longevity of your bike. Follow these simple steps to check the primary oil level effectively.
Removing The Inspection Cover
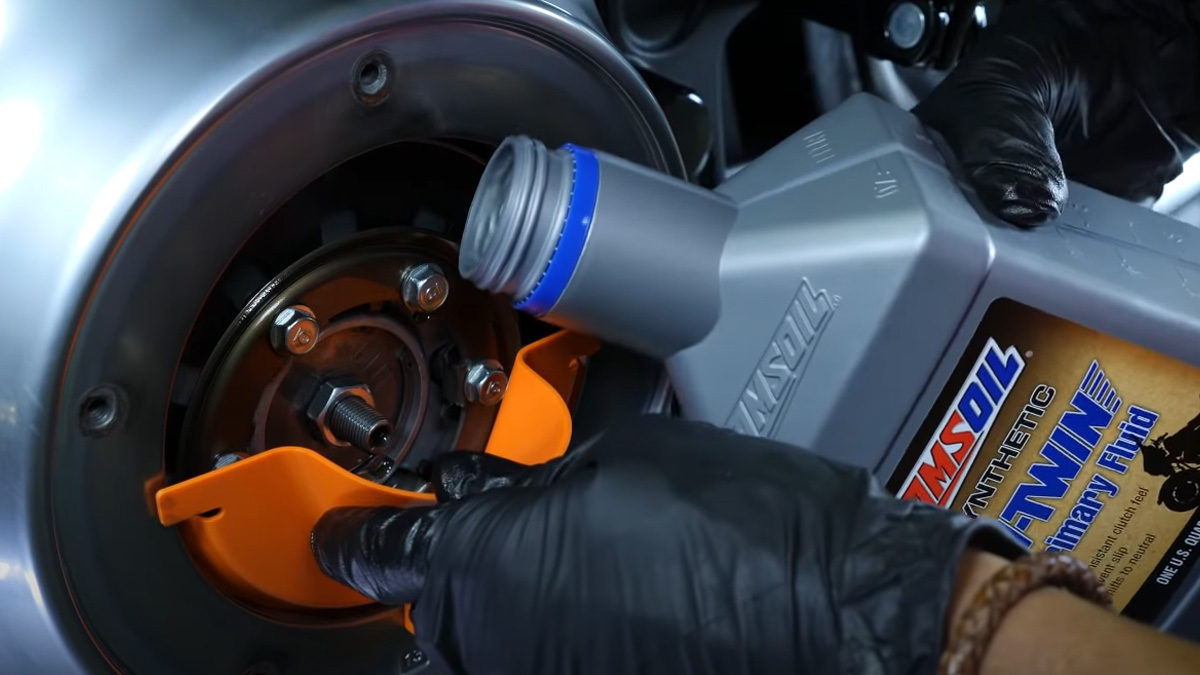
First, locate the inspection cover on your Harley Davidson. It is usually near the bottom left side of the bike. Use a proper screwdriver to remove the screws holding the inspection cover. Be careful not to strip the screws.
Once the screws are removed, gently take off the inspection cover. You will now have access to the primary chaincase. Be cautious of any oil that may spill out when removing the cover.
Assessing The Oil Level
After removing the inspection cover, you can now check the oil level. The primary oil level should be just below the bottom edge of the clutch shell. Use a flashlight to see the oil level clearly.
If the oil level is low, you will need to add more oil. Use a funnel to pour the oil slowly into the primary chaincase. Be careful not to overfill it.
Once the oil level is correct, replace the inspection cover. Tighten the screws securely. Your Harley Davidson is now ready for the road again.
Regularly checking the primary oil level is crucial for your bike’s health. Following these steps ensures your Harley runs smoothly.
Interpreting Oil Level Results
Interpreting oil level results is crucial for Harley Davidson maintenance. This ensures the engine runs smoothly and prevents wear. Understanding when to top off or change the oil helps maintain optimal performance.
When To Top Off
Check the oil level with the bike on a level surface. If the level is low, add oil until it reaches the recommended mark. Use the same type of oil already in the engine. Avoid overfilling, as this can cause engine damage.
When To Completely Change The Oil
Regular oil changes are essential for engine health. Change the oil if it looks dirty or smells burnt. Follow the manufacturer’s recommended intervals for oil changes. Use a high-quality oil suitable for your Harley Davidson model.
Here’s a quick reference table for interpreting oil levels:
| Oil Level | Action Required |
|---|---|
| Below Minimum | Add oil to the recommended mark. |
| At Recommended Level | No action needed. |
| Above Maximum | Remove excess oil to avoid damage. |
Follow these steps to keep your Harley Davidson in top condition. Regular maintenance ensures a longer lifespan for your bike.
Completing The Process
Once you’ve inspected your Harley Davidson’s primary oil, it’s time to complete the process. This involves replacing the inspection cover and cleaning up any spills. Follow these steps for a smooth finish.
Replacing The Inspection Cover
First, align the inspection cover with its mounting holes. Make sure the gasket is in good condition. If it’s damaged, replace it with a new one.
Next, insert the screws into the mounting holes. Tighten them evenly using a torque wrench. Follow the manufacturer’s torque specifications for a secure fit. This ensures a proper seal and prevents leaks.
Cleanup And Disposal Tips
Clean any spilled oil using a rag or paper towels. Dispose of the used towels in a sealed plastic bag. Take care to remove any oil stains from the bike’s surface.
Pour the used oil into a sealable container. Label it as used oil. Do not pour it down the drain. Take it to an appropriate disposal facility.
Wash your hands thoroughly to remove any oil residue. Store your tools in a clean, dry place for future use.
By following these steps, you ensure your Harley Davidson runs smoothly. Regular oil checks keep your bike in top condition.
Maintenance Tips And Best Practices
Maintaining your Harley Davidson is essential for a smooth ride. Knowing how to check the primary oil is crucial. This guide provides maintenance tips and best practices.
Regular Check-up Schedule
Regular check-ups ensure your Harley runs well. Create a check-up schedule and stick to it.
- Weekly: Inspect for oil leaks.
- Monthly: Check oil levels.
- Every 3 months: Change the primary oil.
Keeping a schedule helps catch issues early. This prevents expensive repairs.
Choosing The Right Primary Oil
Choosing the right oil is vital. The wrong oil can damage your bike.
| Oil Type | Viscosity | Temperature Range |
|---|---|---|
| Synthetic | 20W-50 | -10°C to 40°C |
| Mineral | 10W-40 | 0°C to 30°C |
Refer to your owner’s manual for recommendations. Always choose high-quality oil.
Remember to check the oil level regularly. This prevents engine damage.
Credit: www.reddit.com
Frequently Asked Questions
How To Check Primary Oil On Harley Davidson?
Ensure the bike is level. Remove the primary chain inspection cover. Check oil level against the inspection hole’s bottom edge.
What Tools Are Needed For Oil Check?
You need a socket wrench, primary chain inspection cover tool, and a clean rag for wiping the dipstick.
How Often Should You Check Primary Oil?
Check the primary oil level every 5,000 miles or during regular service intervals to ensure optimal performance.
Why Is Primary Oil Important?
Primary oil lubricates the primary chain and clutch, ensuring smooth operation and preventing wear and tear on components.
Conclusion
Checking the primary oil on your Harley Davidson is essential for optimal performance. Regular maintenance ensures your bike runs smoothly. Follow the steps mentioned to keep your Harley in top shape. Proper care extends the life of your motorcycle and enhances your riding experience.
Ride safe and enjoy the journey!


