
The Harley Davidson Bulb Replacement Chart provides detailed information on the correct bulbs for various models. It ensures proper lighting and safety for riders.
Harley Davidson motorcycles are known for their iconic design and powerful performance. Ensuring your bike’s lighting system functions correctly is crucial for safety and aesthetics. The Bulb Replacement Chart is an essential resource for Harley owners. It provides specific details on the appropriate bulbs for different models, helping maintain optimal visibility.
Using the correct bulbs not only enhances your riding experience but also ensures compliance with safety standards. Regularly checking and replacing bulbs as needed can prevent potential issues on the road. This chart is a must-have tool for any Harley Davidson enthusiast aiming for peak performance and safety.
Table of Contents
Introduction To Harley Davidson Bulb Replacement
Harley Davidson motorcycles are known for their iconic style and powerful performance. Keeping your Harley’s lights in top condition is essential for safety and style. Replacing bulbs on your Harley can seem challenging. With the right information, it’s a straightforward task.
Why Bright Lights Matter
Bright lights are crucial for visibility on the road. They help you see obstacles and signal your presence to other drivers. Dim or burnt-out bulbs can lead to accidents. Ensure your Harley’s lights are always bright and functional.
Good lighting improves your riding experience. It keeps you safe during night rides. Bright lights also enhance the look of your Harley, making it stand out.
Common Bulb Types In Harley Models
Harley Davidson motorcycles use various bulb types. Knowing the right bulb type ensures proper replacement. Here are some common bulb types:
- Headlight Bulbs: H4, H7, and LED bulbs.
- Turn Signal Bulbs: 1157, 1156, and LED bulbs.
- Brake Light Bulbs: 3157, 7443, and LED bulbs.
- Tail Light Bulbs: 194, 168, and LED bulbs.
Refer to your Harley’s manual for specific bulb types. This ensures you get the correct bulb for replacement.
| Bulb Type | Common Models |
|---|---|
| H4 | Sportster, Dyna |
| 1157 | Softail, Touring |
| 3157 | Road King, Street Glide |
| 194 | Iron 883, Forty-Eight |
With this guide, replacing your Harley Davidson bulbs becomes easy. Bright lights ensure safety and enhance your bike’s look. Always use the correct bulb type for your Harley model.

Credit: www.yumpu.com
Decoding The Bulb Replacement Chart
Understanding the Harley Davidson Bulb Replacement Chart is crucial. It ensures your bike lights work properly. This chart helps you pick the right bulbs. It’s essential for safety and performance. Let’s dive into how to decode this chart effectively.
Interpreting Bulb Specifications
The bulb replacement chart includes various specifications. These specs include bulb type, wattage, and voltage. Here’s a breakdown:
- Bulb Type: Indicates the specific model of the bulb.
- Wattage: Shows the power consumption of the bulb.
- Voltage: Displays the electrical potential required.
Each specification is crucial for optimal performance. Make sure to match these specs with your bike’s requirements. Incorrect specs can lead to poor lighting or electrical issues.
Matching Bulbs To Your Model
Every Harley Davidson model has unique bulb requirements. Using the correct bulbs is essential. Here’s a simple table to guide you:
| Model | Headlight Bulb | Taillight Bulb | Indicator Bulb |
|---|---|---|---|
| Sportster | H4 60/55W | 1157 8/27W | 1156 27W |
| Softail | H4 60/55W | 1157 8/27W | 1156 27W |
| Touring | H4 60/55W | 1157 8/27W | 1156 27W |
This table helps you find the right bulb for your Harley. Always double-check your bike’s manual for exact specifications.
Using the correct bulbs ensures safety and optimal performance. Happy riding!
Step-by-step Guide To Replacing Bulbs
Replacing bulbs on your Harley Davidson can seem daunting. This guide simplifies the process. You’ll find it easy and safe. Follow the steps carefully for the best results.
Tools You’ll Need
Before starting, gather the necessary tools. Having them ready will make the task smoother.
- Screwdrivers (Phillips and flat-head)
- Socket wrench
- Replacement bulbs
- Gloves
- Clean cloth
Safety First: Preparing Your Bike
Safety is crucial. Always take precautions before working on your bike.
- Turn off the engine and remove the key.
- Disconnect the battery to prevent electrical shocks.
- Put on gloves to protect your hands.
- Ensure the bike is stable on a flat surface.
Step-by-step Instructions
Follow these steps to replace your Harley Davidson bulbs.
- Locate the bulb that needs replacement. Refer to your owner’s manual.
- Remove the screws or clips holding the bulb cover.
- Take off the cover carefully to avoid damage.
- Gently remove the old bulb. Do not force it out.
- Insert the new bulb in the correct position. Handle it with a clean cloth.
- Reattach the bulb cover securely.
- Reconnect the battery and test the new bulb.
Using this guide, you can replace bulbs easily. Keep your Harley Davidson in top condition.
Top Bulb Choices For Optimal Performance
Harley Davidson riders know the importance of good lighting. Choosing the right bulb ensures safety and performance. This section highlights the best options for your bike.
Led Vs. Halogen: Pros And Cons
| Feature | LED | Halogen |
|---|---|---|
| Brightness | Very bright, clear light | Bright but less clear |
| Energy Efficiency | High efficiency, low power | Less efficient, more power |
| Lifespan | Long-lasting, up to 25,000 hours | Shorter lifespan, around 1,000 hours |
| Heat Emission | Low heat production | High heat production |
| Cost | More expensive | Less expensive |
Recommended Brands And Models
Choosing the right brand is crucial for optimal performance. Here are some top recommendations:
- Philips X-tremeUltinon LED: Known for high brightness and long life.
- Osram Night Racer: Offers a good balance of brightness and cost.
- PIAA Xtreme White Plus: Provides a clear, white light.
- Sylvania SilverStar Ultra: A great choice for halogen lovers.
Each of these brands offers reliability and quality. Choose the one that fits your needs.
Led Vs. Halogen: Pros And Cons
Choosing between LED and halogen bulbs depends on your needs. LED bulbs are brighter and last longer. Halogen bulbs are cheaper but less efficient. Here is a quick comparison:
| Feature | LED | Halogen |
|---|---|---|
| Brightness | Very bright, clear light | Bright but less clear |
| Energy Efficiency | High efficiency, low power | Less efficient, more power |
| Lifespan | Long-lasting, up to 25,000 hours | Shorter lifespan, around 1,000 hours |
| Heat Emission | Low heat production | High heat production |
| Cost | More expensive | Less expensive |
Troubleshooting Common Bulb Issues
Experiencing bulb issues on your Harley Davidson? This guide helps you troubleshoot common problems. Proper lighting ensures safety and visibility on the road.
Flickering Lights: Causes And Fixes
Flickering lights can be annoying and dangerous. Understanding the causes can help you fix the issue.
- Loose Connections: Check the bulb socket for loose wires.
- Faulty Bulb: Sometimes a bulb itself is defective. Try a new bulb.
- Corroded Contacts: Clean the bulb contacts with a soft cloth.
- Battery Issues: Ensure the battery is fully charged and in good condition.
If the problem persists, you may need to check the motorcycle’s wiring. Use a multimeter to test for continuity. Replace any faulty wires.
When To Seek Professional Help
Some bulb issues may require professional assistance. Here are signs you need expert help:
- Electrical problems beyond basic troubleshooting.
- Frequent bulb replacements within a short period.
- Visible damage to the motorcycle’s wiring harness.
- Difficulty accessing certain bulb sockets or components.
If you are unsure about fixing the issue yourself, consult a certified Harley Davidson technician. They have the tools and knowledge to resolve complex electrical problems.
| Issue | Possible Cause | Solution |
|---|---|---|
| Flickering Lights | Loose connection | Secure the connection |
| Dim Lights | Weak battery | Charge or replace the battery |
| No Lights | Blown fuse | Replace the fuse |
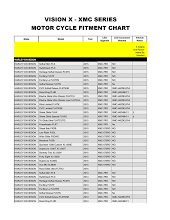
Credit: www.visionxusa.com
Enhancing Visibility With Auxiliary Lights
Enhancing the visibility of your Harley Davidson is crucial for safety. One effective way is by using auxiliary lights. These lights not only improve your visibility but also make your bike look stylish. Let’s explore the different types and how to install them.
Types Of Auxiliary Lights
There are various auxiliary lights available for Harley Davidson bikes. Below are some popular options:
- LED Spotlights: These lights focus on a specific area, providing intense brightness.
- Fog Lights: Ideal for foggy conditions, these lights spread out to cover a wider area.
- Driving Lights: These lights enhance visibility during night rides and in low-light conditions.
- Accent Lights: These lights add a custom look to your bike while improving visibility.
Installation Tips
Installing auxiliary lights on your Harley Davidson is a straightforward process. Follow these tips for a smooth installation:
- Choose the Right Location: Ensure the lights are mounted where they can be most effective.
- Use Quality Mounting Hardware: Secure the lights firmly to avoid vibrations and movement.
- Connect to the Power Source: Use the bike’s existing wiring for a clean installation.
- Test the Lights: Always test the lights after installation to ensure they work correctly.
| Light Type | Best Use | Installation Difficulty |
|---|---|---|
| LED Spotlights | Focused brightness | Medium |
| Fog Lights | Foggy conditions | Easy |
| Driving Lights | Night rides | Medium |
| Accent Lights | Custom look | Easy |
By choosing the right auxiliary lights and following these installation tips, you can significantly enhance your Harley Davidson’s visibility and safety.
Maintaining Your Lighting System
Keeping your Harley Davidson’s lighting system in top condition is crucial. Proper lighting ensures safety during night rides and poor weather. Regular maintenance helps keep your lights bright and functional.
Regular Check-ups
Inspect your lighting system regularly. Check for burnt-out bulbs and cracks in the lenses. Replace any damaged parts immediately. Use a Harley Davidson bulb replacement chart for the correct bulb types.
- Headlights
- Brake Lights
- Turn Signals
- Fog Lights
Use a checklist for systematic inspection. Regular checks can prevent unexpected failures.
Cleaning And Care Tips
Keep your lights clean for maximum brightness. Dirt and grime can reduce visibility.
- Use a soft cloth to wipe the lenses.
- Avoid abrasive cleaners that can scratch the surface.
- Check for moisture inside the lens. Moisture can cause electrical issues.
Ensure the seals around your lights are tight. This keeps water and dirt out. Proper care extends the life of your lighting system.
| Light Type | Recommended Bulb |
|---|---|
| Headlight | H4 Halogen |
| Brake Light | 1157 LED |
| Turn Signal | 1156 LED |
| Fog Light | H3 Halogen |
Follow these tips to maintain your Harley Davidson’s lighting system. A well-maintained system ensures safety and enhances your riding experience.
Credit: www.hdforums.com
Frequently Asked Questions
How Do I Find The Right Bulb Size?
Check your Harley Davidson manual or use an online bulb size chart for accurate information.
Can I Use Led Bulbs On My Harley?
Yes, LED bulbs are compatible and offer better brightness and energy efficiency for your Harley Davidson.
How Often Should Bulbs Be Replaced?
Bulb replacement depends on usage. Check your lights regularly and replace them if they dim or fail.
Where Can I Buy Replacement Bulbs?
You can purchase replacement bulbs from Harley Davidson dealerships, auto parts stores, or online retailers.
Conclusion
Replacing Harley Davidson bulbs is simple with the right chart. Always use the correct bulb type for safety. Refer to the Harley Davidson bulb replacement chart for guidance. Keep your ride well-lit and safe. Ensure you have the right bulbs for every part of your bike.
Happy riding!


